How to update the DNS Records (A, AAAA, CNAME, MX, TXT, SRV) for my domain
If your domain name is registered with Web Hosting Canada you can easily update your DNS records of type A, AAAA, CAA, CNAME, MX, TXT and SRV by using the Domain Manager, available for free in your Client Area. If you also have a hosting account with us, you can manage your DNS records directly from your cPanel, using the Advanced Zone Editor.
How to update using the Client Area
You can easily update your DNS records using the Domain Manager in your Client Area. Below is a description of each record type (A, AAAA, CAA, CNAME, MX, TXT, SRV) and the process for updating each.
A Records
An Address Mapping record (A Record) points a domain to the IPv4 address of the computer hosting that domain (e.g. www to 12.344.676.90).
To add an A record:
- Log in to your Client Area
- Select Domains from the side menu
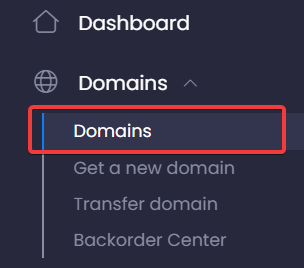
- Click on the domain to manage
- Select the settings 'gear' icon from the top-right menu, then click Advanced DNS Manager
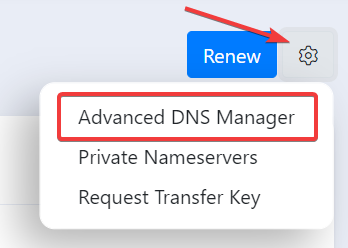
- Click Add Record
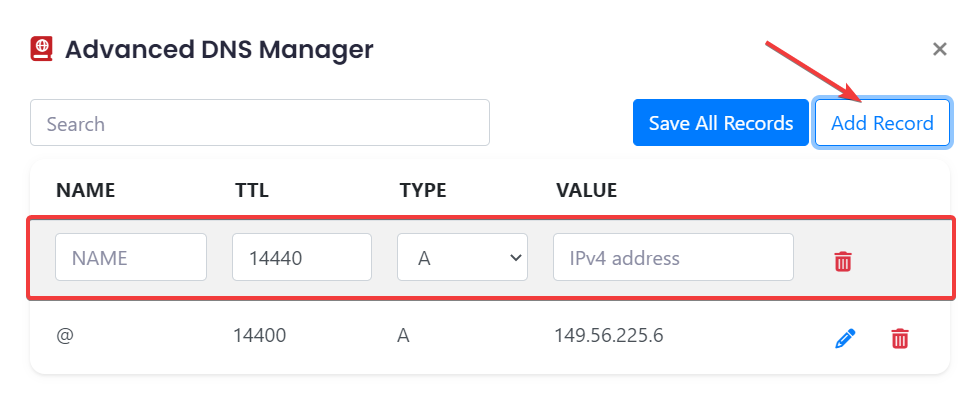
- Add your record information:
- NAME: The source name, (e.g. www)
- TTL: Time To Live; if in doubt enter 14400
- TYPE: Select A
- VALUE: The host IPv4 address
- Click Save All Records to save your changes

Your changes should take effect once the new DNS records propagate, within the next 48 hours (generally in about 4 hours).
AAAA Records
AAAA records are exactly like A records; they point a domain to the IP address of the host. The difference is they map to an IPv6 address instead of an IPv4 address. IPv6 is the latest version of the Internet Protocol (IP).
To add an AAAA record:
- Log in to your Client Area
- Select Domains from the side menu

- Click on the domain to manage
- Select the settings 'gear' icon from the top-right menu, then click Advanced DNS Manager

- Click Add Record
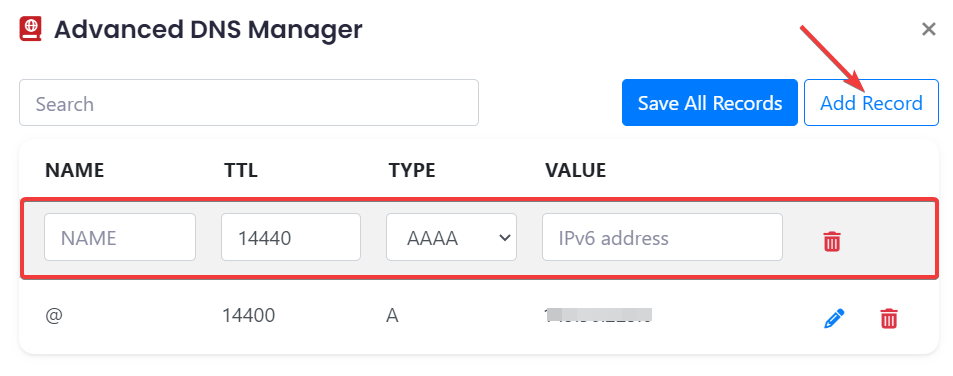
- Add your record information:
- NAME: The source name, (e.g. www)
- TTL: Time To Live; if in doubt enter 14400
- TYPE: Select AAAA
- VALUE: The host IPv6 address
- Click Save All Records to save your changes

Your changes should take effect once the new DNS records propagate, within the next 48 hours (generally in about 4 hours).
CAA Records
Certification Authority Authorization (CAA) records allow domain owners to declare which Certification Authorities (CA) are allowed to issue an SSL certificate for a domain. If no CAA records exist, any CA is allowed to issue a certificate for the domain. If a CAA record is present, only the CAs listed in the record(s) are authorized to issue SSL certificates for the domain.
To add a CAA record:
- Log in to your Client Area
- Select Domains from the side menu

- Click on the domain to manage
- Select the settings 'gear' icon from the top-right menu, then click Advanced DNS Manager

- Click Add Record
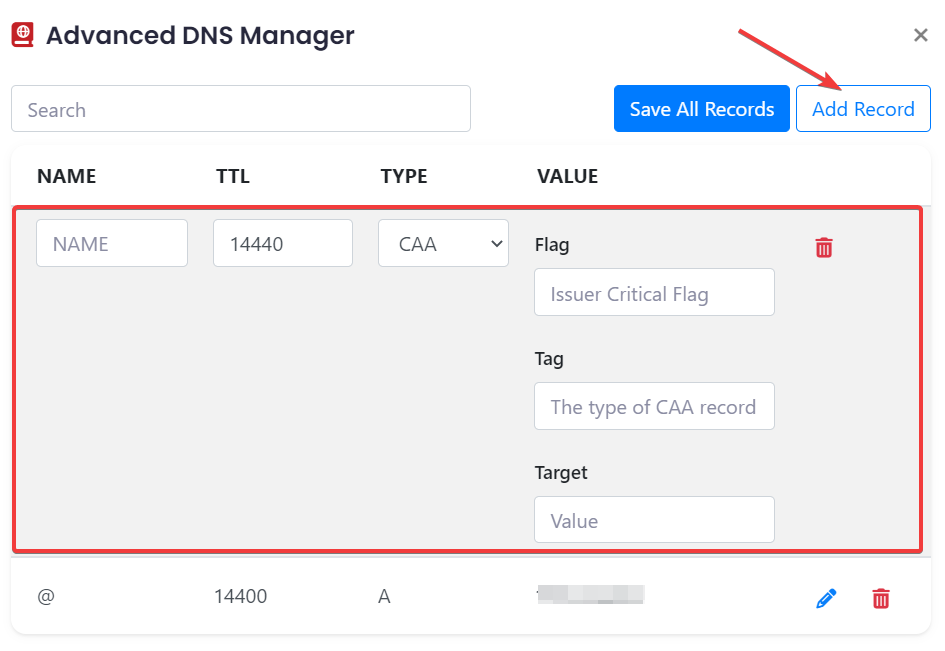
- Add your record information:
- NAME: The source name, (e.g. “@” refers to the domain itself)
- TTL: Time To Live; if in doubt enter 14400
- TYPE: Select CAA
- VALUE:
- Issue: permits a single CA to issue any type of certificate
- Issuewild: permits a single CA to issue a wildcard certificate
- Iodef: defines a URL where a CA can report policy violations
- Flag: An integer between 0–255
- Tag: The CAA record type depending on your requirements:
- Target: The target address associated with the tag (e.g. letsencrypt.org)
- Click Save All Records to save your changes

Your changes should take effect once the new DNS records propagate, within the next 48 hours (generally in about 4 hours).
CNAME Records
A Canonical Name (CNAME) record points a domain name to another domain name, instead of an IP address. CNAME records are often used to point a subdomain (e.g. www or mail) to the domain hosting that subdomain's content.
To add a CNAME record:
- Log in to your Client Area
- Select Domains from the side menu

- Click on the domain to manage
- Select the settings 'gear' icon from the top-right menu, then click Advanced DNS Manager

- Click Add Record
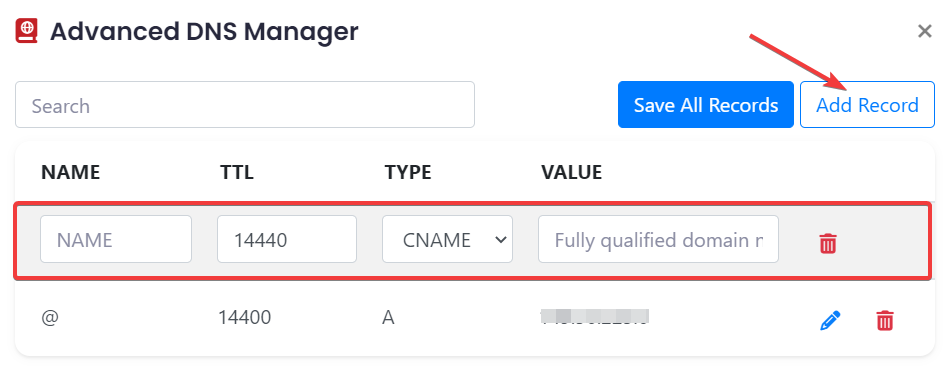
- Add your record information:
- NAME: The source name, (e.g. www)
- TTL: Time To Live; if in doubt enter 14400
- TYPE: Select CNAME
- VALUE: A fully qualified domain name (e.g. www.example.com)
- Click Save All Records to save your changes

Your changes should take effect once the new DNS records propagate, within the next 48 hours (generally in about 4 hours).
MX Records
The Mail Exchange (MX) record defines how email messages should be handled for a domain name, essentially assigning the mail server responsible for sending and receiving your emails. For example, if you add an MX record provided by Microsoft Outlook to your domain, any email received by your domain will be handled through the Outlook.com mail servers.
To add an MX record:
- Log in to your Client Area
- Select Domains from the side menu

- Click on the domain to manage
- Select the settings 'gear' icon from the top-right menu, then click Advanced DNS Manager

- Click Add Record
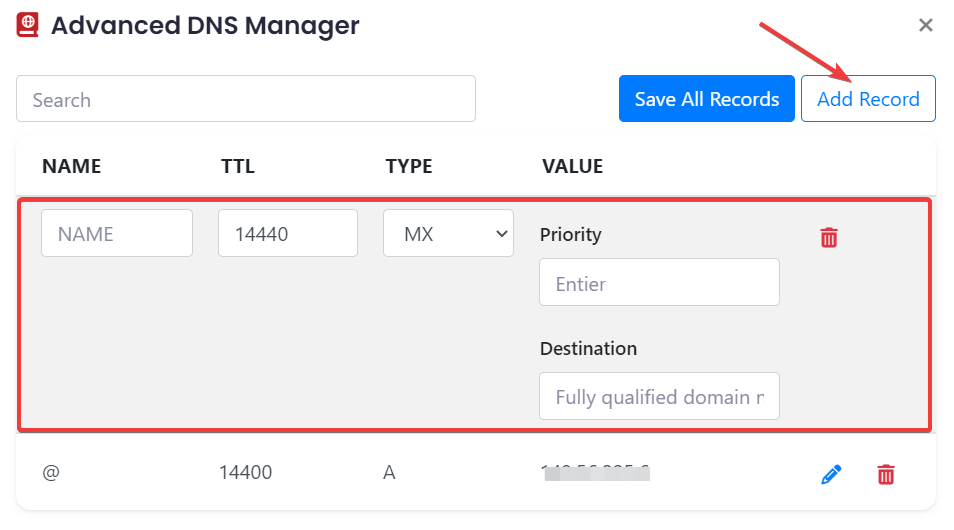
- Add your record information:
- NAME: The source name, (e.g. @)
- TTL: Time To Live; if in doubt enter 14400
- TYPE: Select MX
- VALUE:
- Priority: A number from 0 to 100, where the lowest number = the highest priority
- Destination: Your external hostname (e.g. mail.outlook.com)
- Click Save All Records to save your changes

Your changes should take effect once the new DNS records propagate, within the next 48 hours (generally in about 4 hours).
TXT Records
Text (TXT) records contain text information for sources other than your domain. They’re commonly used to reduce mail spam by adding SPF (Sender Policy Framework) and DKIM (Domain Key Identified Mail) records that add encryption to outgoing mail.
To add a TXT record:
- Log in to your Client Area
- Select Domains from the side menu

- Click on the domain to manage
- Select the settings 'gear' icon from the top-right menu, then click Advanced DNS Manager

- Click Add Record
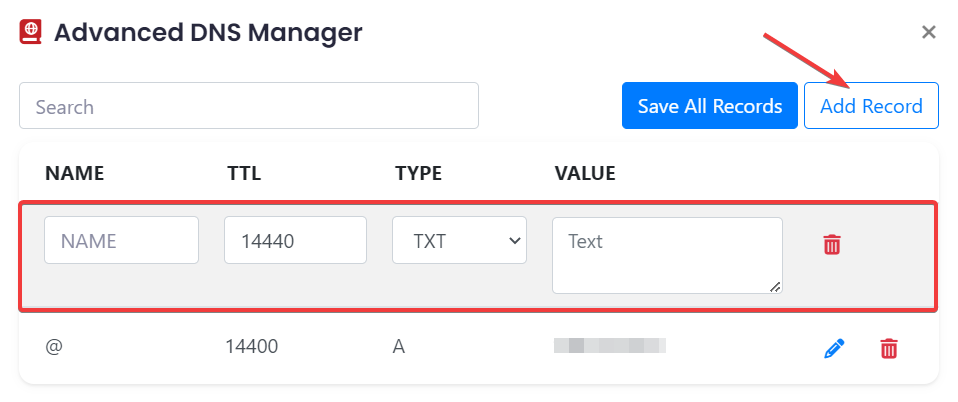
- Add your record information:
- NAME: The source name, (e.g. @)
- TTL: Time To Live; if in doubt enter 14400
- TYPE: Select TXT
- VALUE: Your text input information (e.g. v=spf1 a mx include: example.com -all)
- Click Save All Records to save your changes

Your changes should take effect once the new DNS records propagate, within the next 48 hours (generally in about 4 hours).
SRV Records
A Service (SRV) record is used to define both the host and port for specific types of services (e.g. VoIP). Most record types only specify the server or IP address, however SRV records let you define the port as well.
To add an SRV record:
- Log in to your Client Area
- Select Domains from the side menu

- Click on the domain to manage
- Select the settings 'gear' icon from the top-right menu, then click Advanced DNS Manager

- Click Add Record
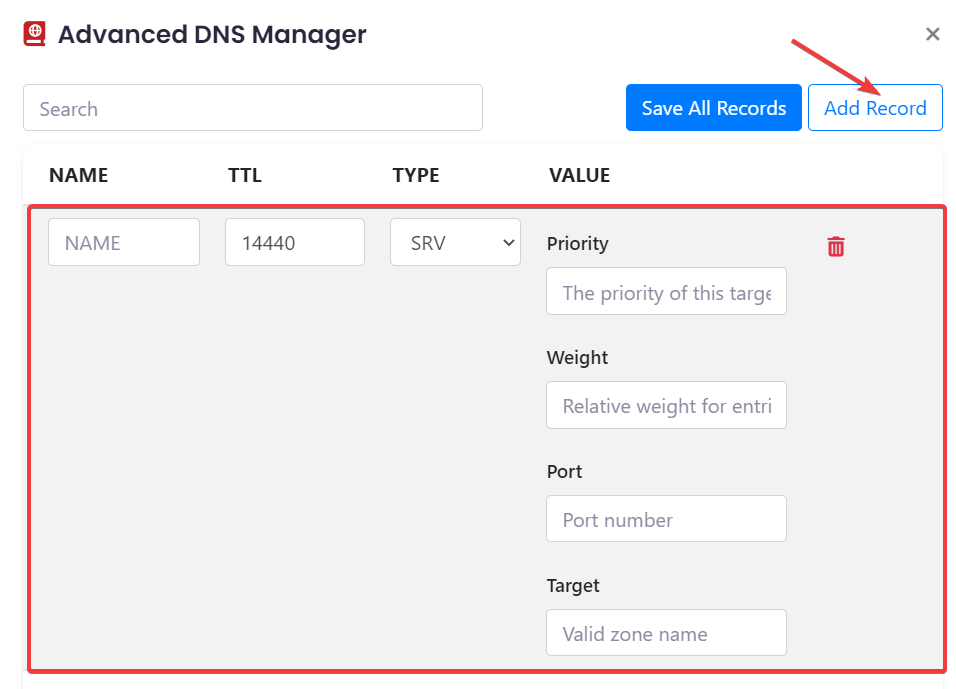
- Add your record information:
- NAME: The source name, (e.g. example.com)
- TTL: Time To Live; if in doubt enter 14400
- TYPE: Select SRV
- VALUE:
- Priority: The priority of the target host (e.g. 10)
- Weight: The relative weight for entries with the same priority (e.g. 5)
- Port: Your port number (e.g. 5223)
- Target: A valid zone name (e.g. server.example.com)
- Click Save All Records to save your changes

Your changes should take effect once the new DNS records propagate, within the next 48 hours (generally in about 4 hours).
How to update using cPanel
If you have a hosting account with us, you can manage your DNS records directly from your cPanel, using the Advanced Zone Editor.
To Create or Modify an MX Entry
MX entries determine which servers will handle incoming emails on your domain.
- Log in to your cPanel (if you have an active hosting account for your domain)
- Click on MX Entry
- Select the Domain to manage
- Under Email Routing, select Automatically Detect Configuration (Recommended) and click Change to ensure your mail gets routed correctly.
- To create a new MX Record, scroll down to Add New Record and enter a Priority (a number from 0 to 100, where the lowest number = the highest priority), a Destination (generally an external hostname), and finally click on Add New Record.
- To change an existing MX, scroll down to the section called MX Records and click Edit next to the entry you want to change. Update the settings you need and click Edit.
Changes should take effect once the new DNS records propagate, over the next 48 hours (generally in about 4 hours)
To Create or Modify A, AAAA, CAA, CNAME, TXT or SRV DNS Records
For a complete list of DNS record types and their function, please refer to https://en.wikipedia.org/wiki/List_of_DNS_record_types
- Log in to your cPanel (if you have an active hosting account for your domain)
- Click on Zone Editor (under the Domains section)
- Select the domain you wish to manage from the list
- To add a record, scroll to the Add a Record section, select a Type of record, enter its Name, TTL (Time To Live; if in doubt enter 14400), and a destination Address, then click Add Record.
- To modify an existing record, scroll down to the Zone File Records section and click Edit next to the record you want to change. Adjust the values as needed, then click the Edit Record button to save.
Changes should take effect once the new DNS records propagate, over the next 48 hours (generally in about 4 hours).
Important Note
In order for any of these changes to take effect, your domain needs to be using our nameservers. The correct DNS to use will depend on your product, and will normally have been communicated to you in your Welcome email.
You can also refer to the table below:
| Type | Nameservers | Services that use it |
|---|---|---|
| Parking | parking1.whc.ca parking2.whc.ca |
|
| Standard |
ns1.whc.ca |
|
| Anycast | cloud1.whc.ca cloud2.whc.ca |
|
| Reseller | ns1.web-dns1.com ns2.web-dns1.com ns3.web-dns1.com |
|
| ManagedWP | ns1.wpdns.ca ns2.wpdns.ca |
|
| Private | Custom, eg: ns1.cloud123.mywhc.ca ns2.cloud123.mywhc.ca |
|
| LifeBoat |
ark1.whc.ca |
|

