How to Install WordPress on your Web Hosting account
WordPress can be installed automatically via your cPanel control panel.
- Log in to cPanel
- Under Popular Tools, click on 1-click Apps Installer. A list of the most popular scripts will appear

- Move your cursor over the WordPress icon under Top Scripts
- Click on Install

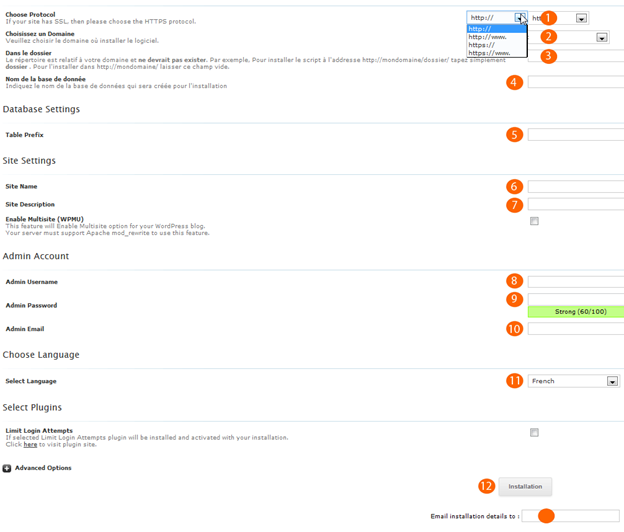
Complete the installation form as follows:
-
Choose Protocol: If you have configured an SSL certificate select (https://) otherwise (http://).
-
Choose Domain: Click on the drop-down menu and select your domain name
(if you have several domains make sure to select the domain for which you want to perform the new installation)
-
In Directory: If you want to install WordPress in the root directory (recommended), leave the field empty. Otherwise enter the directory (subfolder) you wish the website to found under.
-
Site Name: Name your WordPress website
-
Site Description: Enter a general statement on what your site is about
-
Enable Multisite (WPMU): This will allow you to create multiple websites under one WordPress installation. This option is not recommended unless you are a power-user.
-
Admin Username: Provide an new admin username or keep the one suggested (admin).
-
Admin Password: We recommend using the password generator provided. Make sure to remember or write down the generated password.
-
Admin Email: Enter your email address.
-
Select Language: Choose the primary language you would like to work in.
-
Limit Login Attempts (loginizer):This security plugin will limit the amount of times an individual can attempt to log into your wordpress account (recommended).
Advanced Options (optional)
Click on Advanced Options to open the menu
-
Database Name: We recommend leaving this unchanged, unless you will have a database connected to the website. In that case, you can create the containing folder for the database here.
-
Table prefix: We recommend leaving this unchanged, unless you wish the prefix to be different.
-
Disable Update Notifications Emails: Don’t enable this unless you wish to avoid receiving emails about wordpress updates.
-
Auto Upgrade: We strongly recommend enabling this option (checking the box) as updates will provide the latest security improvements to your WordPress site.
-
Auto Upgrade WordPress Plugins: We strongly recommend enabling this option (checking the box) to ensure that your plugins are up-to-date and secure.
-
Auto Upgrade WordPress Themes: We strongly recommend enabling this option (checking the box) to ensure that your WordPress theme is up-to-date and secure.
-
Backup Location: Keep the default setting (Default). WHC hosting clients are provided with an automatic backup program (JetBackup), removing the need for a WordPress based backup program.
-
Automated Backups & Backup Rotation: Keep the default setting (Don’t Backup). Automatic backups are already managed by WHC on web hosting accounts and should not be managed here.
Select Theme: Themes can be selected (or changed) at a later time from your Wordpress admin. However, you may choose an initial theme here. Click on Select Theme to open the menu
- Search: Click on search to browse from possible themes (templates) for your website. You can also type industry specific words into the search bar to find themes.
- Select: WordPress will provide a few suggestions on possible themes. You may choose one by clicking select.
Install
- Install: Click when you are ready to install WordPress
- Email Installation Details to: Add an email address to receive information on the installation.

Installation Completed: Save this information!
When the installation is finished you will be redirected to the installation page, where you will find
-
A Link to your site
-
A Link to the administrative section of your site
To sign into your wordpress account: Click the link to the administrative section of your new website and provide the username and password you just created. You can also log in to your Wordpress admin by accessing your website and adding wp-admin in the address bar. For example, by entering: www.yourdomain.com/wp-admin in the address bar.
Now you are ready to build a new website with WordPress!

